 Batch processing of images in Affinity photo is really easy. A perfect use case for this is to change the size of an entire folder of images for use in your blog.
You’ve just finished taking pictures of your products and now you want to post them to your blog. You have 50 wonderful, high-res JPG files, but you know that each one will need to be resized for optimal viewing online. You’ve decided that you want them all to be 800 pixels on their longest side, and you also want then all to be converted to PNG files. There’s got to be an easier way to do this than opening, resizing, and saving-as 50 times!
There is: it’s the Batch Job feature in Affinity Photo. Here’s the process in just 5 steps (if we don’t include the prep!).
Prep Work
If you plan to do any cropping or other enhancements to the photos, you should do that before you run the batch job. (Personally I think cropping is an important part of interesting photography, but my partner thinks I usually go too far…)
Next, it would be most convenient for you if all your source images start out in the same folder. This is totally optional, it’ll just make things a little easier for you later.
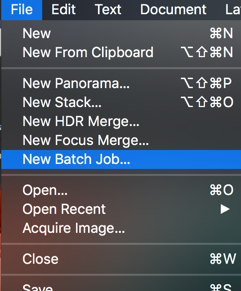
When you’re ready to start, open Affinity Photo, then from the File menu, choose “New Batch Job” to open the New Batch Job panel.
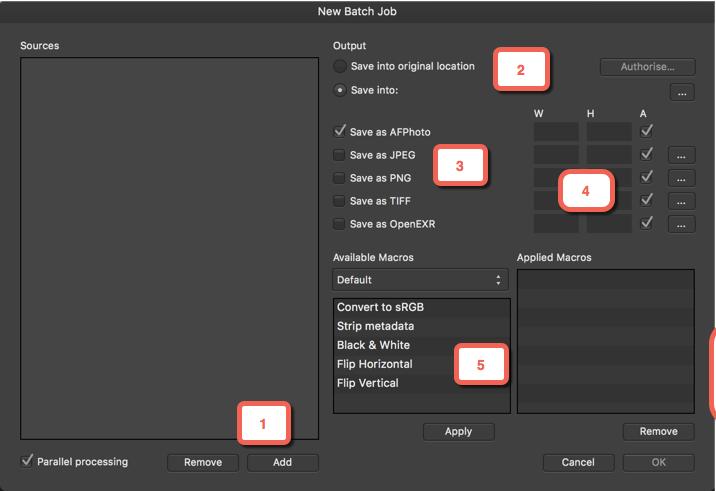
The image below shows the New Batch Job panel, and I’ve added numbering which corresponds to the steps described in detail below.
Step 0. First we must Authorize:
The first time you ever run a batch job, Affinity will need you to give it permission to write to your computer. Just click on the “Authorize” button in the upper-right corner of the panel. It will bring up a window, then you click the Authorize button (no need to choose a folder). Do this once, then you’ll never have to do it (on this computer) again. Yeah, a silly little step, but things like this is the reason why viruses are so uncommon in the Mac world — so it’s well worth it!
Now to your batch job…
Step 1. Source files to process:
Click the “Add” button to select all the files to include. Use shift-click or cmd-click to select multiple files. Keep adding from as many folders as you like: there’s no limit (that I know of) to the number of files you can process at one time as long as your computer has the power to deal with it.
When you are finished selecting, your computer will chug for a moment to render thumbnails for all your selected images and display them in the Sources box on the left side of the New Batch Job panel.
Step 2. Output location:
Under Output, which is just to the right of the Sources box, you will select whether to save the images into the same places where they came from, or to save them into a new place. I suggest that you always select “Save into” — this way you will never accidentally overwrite your original files. Click the “Save into” radio button, then click the “…” button on the right side to select the folder where the new files are to be saved.
Step 3. Output type:
Still in the Output section, you will see a list of file types. Click the checkbox beside the type of file to convert to (and you can have multiple file types selected). For online use such as a website or blog, I suggest jpg or png (I usually favor png). Be sure to also un-check the “AFPhoto” file type, otherwise it will save your desired file type and also an Affinity Photo file for each of the images in your Source list.
OPTIONAL: Each file type also allows you to set other options. You can generally just use the defaults, but it’s worth looking at them. To access these options, click the “…” button to the right of the “A” column in the row for the applicable file type.
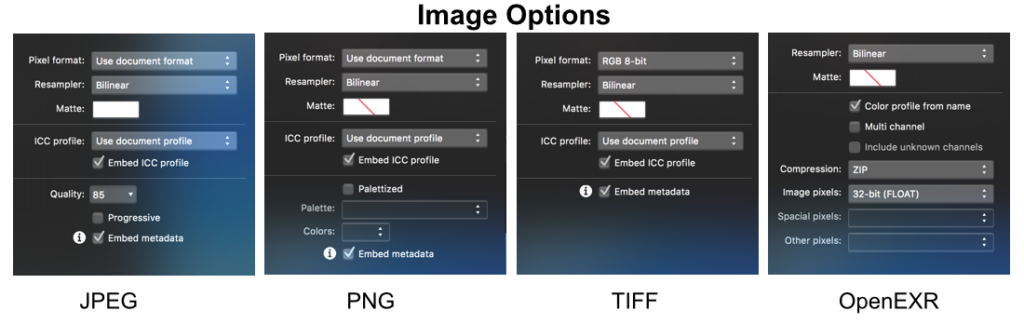
(Click to see larger image)
Step 4. Indicate the new size:
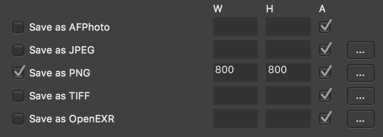 On the same row as the file format that you selected, indicate the pixel dimension of the longest edge of the photo. In order for this to work correctly on horizontal and vertical images in one process, you enter that same number on both sides. Then make sure that in the “A” column (A for aspect ratio) there is a checkmark — which means that Affinity must make sure to keep the proper aspect ratio and only apply the new number to the longest edge of the photo. (See the example in the screenshot — this will resize it to 800 Wide on the horizontal images, and 800 High on the vertical images.)
Optional Step 5. Macros:
You can also do additional processing, such as making all the images black and white. (For processing images for the web, converting them to sRGB is a good idea, but optional). Affinity comes preinstalled with a few macros, and down the road when you are an Affinity expert you can record your own complicated macros — such as to add a copyright watermark to your photos. To choose a macro, click on it then click the Apply button and it will be moved over to the Applied Macros list. If you change your mind, click on the applied macro and click the Remove button.
Engage!
Ready to run the batch job? Click OK — and off it goes! It will show you its progress as it goes, and when it is done it closes the New Batch Job panel.
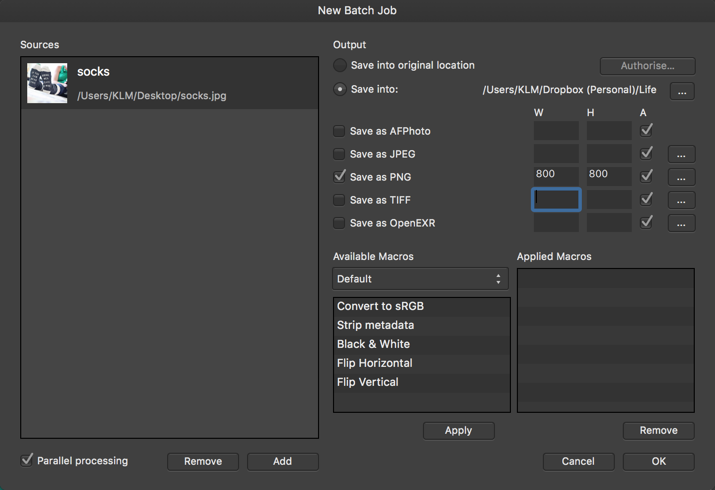
See — I told you it would be easy. The following image shows the New Batch Job panel filled in to run a resize job.